You might have multiple choices when it comes to flooring. Epoxy flooring is one of the most popular choices because it is durable, scratch and stain-resistant, and easy to clean. But epoxy itself does not provide a long-lasting, smooth, shiny surface, the installation technique has a significant impact.
Properly done epoxy flooring can make all the difference in terms of the look of your floor. It can either give it the best look or completely ruin it. You need to be very careful when doing this job.
Although applying epoxy is relatively simple, it is important to know how to do epoxy flooring the right way to obtain the maximum benefits and results. It’s important to clean the floor thoroughly, mix the epoxy properly, and apply the right amount. We will now describe the proper method for installing epoxy flooring.
How to Do Epoxy Flooring the Right Way: Steps to Follow
To begin, you will need to gather all the necessary materials and tools. These include a two-part epoxy flooring kit, a scraper/wire brush/stiff bristle brush, broom, vacuum, paintbrush, 3/8 inch or 3/16 nap roller, duct tape, high-powered detergent, concrete etch, etc.
There are three types of epoxy flooring kits available in the market – water-based, solvent-based, and 100% solid. You can choose any one of them depending on your needs. Let’s now take a look at the steps involved in doing epoxy flooring the right way.
Step 01: Clean the Floor Thoroughly
The first and foremost step is to clean the floor thoroughly. For your own safety, you should wear gloves, safety glasses, and a mask. Using a scraper, wire brush, or stiff bristle brush, remove all the loose contaminations and materials from the floor. Sweep the floor to remove any fine particles.
Vacuum the floor to pick up any particles that the broom may have missed. If the floor has oil or grease stains, treat them with a high-powered detergent. Let the floor dry completely before proceeding to the next step.
Step 02: Etch the Floor
After the floor is completely dry, the next step is to etch the floor. This will help the epoxy to adhere to the floor better. Mix the concrete etches according to the instructions on the label.
Pour it on the floor and scrub it with a stiff brush. Let it sit for 10-15 minutes, and then rinse it off with clean water. Ensure the floor is completely dry before continuing. A complete drying process may take between 24 and 48 hours, depending on the weather and humidity.
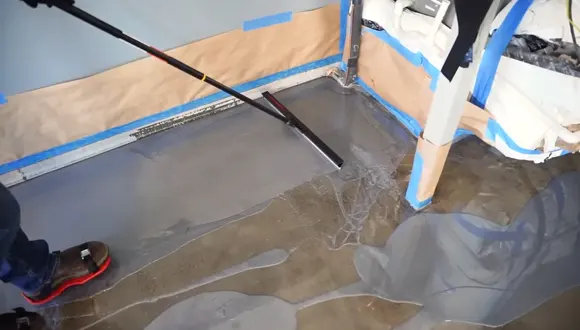
Step 03: Prepare the Room
The areas that you do not wish to epoxy should be sealed off with duct tape. This includes baseboards, walls, cabinets, etc. To ensure that no epoxy gets on the unwanted areas, you need to seal them very carefully.
It is important to ensure the tape is high enough so that you can apply the epoxy without worrying about it seeping through. If you would like to be extra safe, you can layer multiple layers on top of one another.
Repair any holes or cracks in your concrete floor with a concrete patching compound. To achieve the best results, ensure that all floor surfaces are completely and evenly dry.
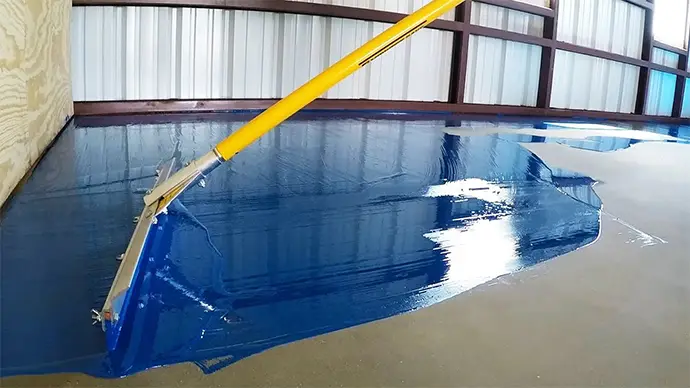
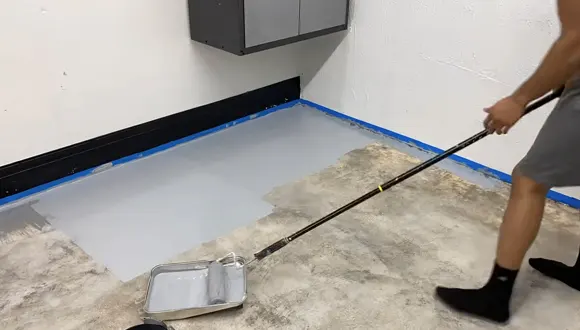
Step 04: Mix and Apply the Epoxy
Once you are satisfied that the floor is completely dry, it is time to mix and apply the epoxy. Read the instructions on the epoxy kit carefully before proceeding. Generally, you will need to mix one part epoxy resin with one part hardener.
Once mixed, it should be applied immediately as it will start solidifying quickly. Pour the mixed epoxy onto the floor and spread it evenly. You can use a paintbrush to reach corners and edges.
Use a 3/8 or 3/16 nap roller to spread the epoxy evenly across the floor surface. Be sure to work in small sections so that the epoxy does not start solidifying before you have a chance to spread it evenly.
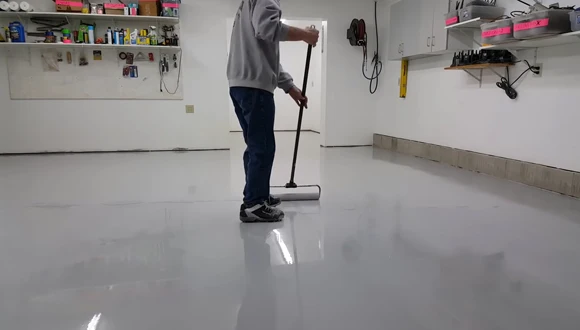
Step 05: Let It Cure Completely and Apply a Second Coat
After you have applied the epoxy, let it cure completely. A temperature of 77° F and a warm environment may require 9 to 12 hours for the epoxy to cure completely.
If it is cooler than 77° F, it may take about 12 to 18 hours. Once the epoxy has cured completely, you can apply a second coat if desired.
Mix and apply the second coat in the same way as the first coat. Once applied, let it cure completely before walking or driving on it. Remove the duct tape, and you’re done.
How Long Do I Have to Wait to Apply Epoxy to Newly Installed Flooring?
If you have just installed a new floor, you need to wait at least 28 days before applying the epoxy. This is because it takes time for the concrete to cure completely.
When epoxy is applied too soon, it will not adhere properly and will start peeling off. In some cases, it can even cause the newly installed flooring to crack.
In order to achieve good results, it is best to wait between 30 and 60 days before applying the epoxy. This will give the concrete plenty of time to cure and will result in a better bond between the epoxy and the floor.
What Temperature Is Too Cold to Apply Epoxy on the Concrete Floor?
A temperature range of 50 to 86 degrees Fahrenheit is ideal for the application of epoxy. Temperatures below 50 degrees Fahrenheit are considered to be too cold. Applying epoxy below 50° F is not recommended because it can result in a number of problems.
The epoxy may not cure properly, which can cause it to become brittle and break down over time. In some cases, the epoxy may not adhere properly to the concrete surface, resulting in a poor bond between the coating and the concrete. The low temperature can prevent the epoxy from achieving its full strength, leading to premature failure.
Properly Apply Epoxy and Enjoy Your New Epoxy Floor
We hope that you fully understand the process of how to do epoxy flooring the right way. If you follow the above steps carefully, you will achieve amazing results. Remember to take all necessary safety precautions, such as wearing gloves and a mask, to protect yourself from the fumes.
Allow plenty of time for the epoxy to dry thoroughly before you walk or drive on it. Once cured, your new epoxy floor will be tough, durable, and easy to clean. It will also add value to your home and make it look more stylish.