We all know that construction projects don’t always go as planned. Whether it’s a faulty foundation or improperly cured concrete, there are many things that can go awry during the building process. A possible obstacle you may confront is gaps between concrete steps and brick walls.
These can cause a number of problems, including Trip hazards, Water infiltration, and aesthetically unpleasing appearance. But never fear; we’re willing to help. In this blog post, we are here to discuss a few different ways that you can seal these cracks and gaps.
How to Seal Gaps Between Sides of Concrete Steps and Brick Walls?

A few methods are provided below for sealing gaps between concrete steps and brick walls.
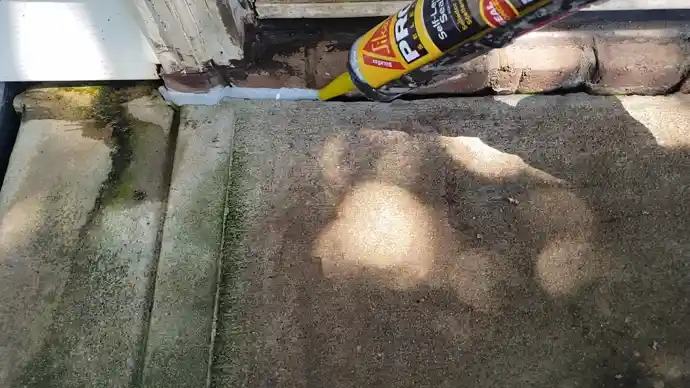
Method 1: Caulking
Applying caulk between the sides with concrete steps and brick walls is a great way to improve your home’s appearance and prevent moisture from entering. The process can seem a bit daunting if you’ve never applied to caulk before. This guide will walk you through everything you need to know about caulking so that you can confidently tackle this home improvement project.
Choosing Caulk Type
Regarding caulking, there are two main types to choose from: silicone and acrylic. So, how do you know which one is right for your needs? Well, it all depends on the location of the gap. If the gap is constantly exposed to moisture, such as around sinks, tubs, and showers, then silicone caulk is your best bet. This caulk is designed to withstand constant exposure to water without breaking down or becoming less effective.
On the other hand, if the gap is in a dryer area, such as around windows or doors, then the acrylic caulk is a better option. Acrylic caulk can still stand up to some moisture, but it’s not designed for constant exposure like silicone caulk. Therefore, it will last longer in a drier area. So, when choosing the caulk type, keep the location of the gap in mind.
Prep The Area
If you want to achieve the best results from your caulking project, it is important to prepare the surface area properly before you begin. First, use a damp rag to remove any particles, fine-grain residue, or grease from the surface. If there is any old caulking that needs to be removed, use a putty knife or caulk remover tool to get rid of it.
Once the surface is clean, give it a few minutes to dry thoroughly before moving on to the next step. By prepping the area properly, you can be sure that your new caulking will last a long time to come.
Using Painter’s Tape
Applying painter’s tape is a crucial step when using silicone caulk. The tape helps to create straight lines and prevent caulking mistakes. When applying the tape, be sure to press down firmly so that there is a good seal.
Otherwise, the silicone caulk can seep underneath the tape and cause problems. Once the tape is in place, you’re ready to begin caulking. The tape creates a clean, professional-looking finish.
Apply The Caulk
Cut the tip off of the caulk tube at a 45-degree angle so that there is a ½-inch opening. Insert the tube of caulk into a caulking gun, then squeeze the trigger until a small amount of caulk comes out of the opening. Starting at one corner, slowly run the bead of caulk along the gap between the concrete step and the brick wall.
Continue running the bead of caulk until you reach the other corner. If you’re using silicone caulk, ensure you smooth it down with your finger immediately after applying it; otherwise, it will become permanently wrinkled when it dries.
Dry Caulking Thoroughly
Clean up excess caulking and allow it to dry completely before using the area. This will typically take 24 hours but may vary depending on weather conditions and what type of caulk you use. Once the caulking is dry, it will be much more effective at sealing gaps and preventing moisture from seeping through.
If you don’t allow the caulking to dry fully, it may not adhere properly and could start to peel off over time. Dried caulking is much easier to remove if you ever need to make repairs or replace it. So, for best results, give your caulking plenty of time to dry before putting it to use.
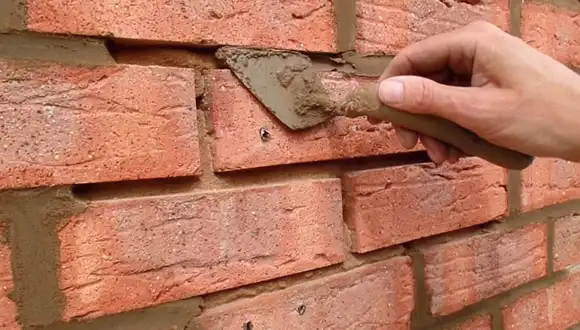
Method 2: Mortar Mix
Resolving this foundation problem by sealing the gaps with mortar mix is possible. You can learn how to do this by following the steps below.
Clean the Area
The first step in applying mortar mix is to clean the area. This can be done with a wire brush to remove loose particles or residue. You can also use a power washer, but it is essential to let the area dry completely before proceeding.
If there is any moisture present, it will weaken the bond between the mortar and the surface. Any holes or cracks should be filled in before applying the mortar mix. This will help to create a smooth, even surface for the mix to adhere to. Once the area is prepared, you can proceed with the next step.
Mix the Mortar
Next, you will need to mix the mortar according to your manufacturer’s instructions. Be sure to mix it well so that it is of consistent consistency. The mortar will act as a sealant between the sides of the concrete steps and the brick walls.
This will help to prevent water and other elements from penetrating the foundation crack and causing further issues. The mortar will also help to bind the concrete and bricks together, providing additional support for the structure.
Apply the Mortar
Once the mortar is mixed, it can be applied to the gap using a trowel. It is vital to apply an even layer of mortar over the entire length of the gap to create a strong bond between the concrete and the brick.
If the bond is not strong, there is a risk that the concrete steps could eventually become detached from the brick wall. If you take the time to apply mortar properly, you can help make sure your concrete steps will remain securely attached to the retaining wall for many years to endure.
Surface Smoothness
It is essential to smooth out the surface after securing gaps between the surfaces of concrete steps and brick walls because this will create a more consistent look and feel. By using a wet sponge, you can quickly smooth out any rough edges or inconsistencies.
Allowing the mortar to dry completely before walking on it or proceeding with any other projects is crucial to avoid compromising the work that has been done. These simple steps will keep your concrete steps and brick walls sealed and protected from the elements.
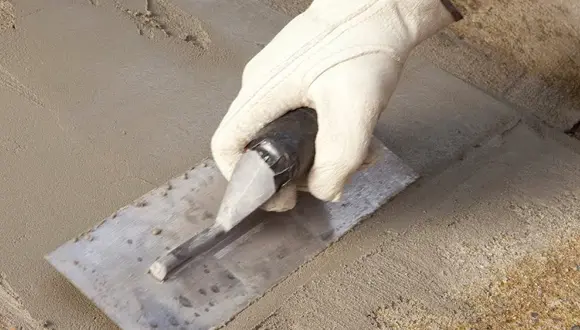
Method 3: Concrete Patching Compound
The following instructions will walk you through the steps that need to be followed in order to seal gaps with a concrete patching compound:
Preparing the Area
You can see that before proceeding with any of these methods, the surface must be cleaned. It is essential to take the time to prepare the surface before you begin patching. This usually involves cleaning the area to remove waste, particles, or loose paint. In some cases, you may also need to scrape away peeling paint or sand the surface to create a smooth surface for the patching compound.
Once the area is clean, wet it down with a water hose. This will help the patching compound adhere to the surface better. For best results, allow the surface to dry completely before proceeding to the next step. By preparing the surface properly, you can ensure that your patch will provide a long-lasting repair.
Applying the Patching Compound
Now it’s time to apply the patching compound. First, mix up the Portland cement-based patching compound according to the manufacturer’s instructions. Once mixed, rely on a putty knife or trowel to apply it to the gap between the brick wall and the concrete steps.
Apply a generous amount so that it fills the gap. Utilize an appropriate putty knife or trowel to smooth out the patching compound so it’s level with the surface of the concrete steps and brick wall. Allow 24 hours for the patching compound to cure before moving on to step 3.
Finishing Up
It’s vital to finish up the foundation repair process correctly to ensure that your steps and masonry wall look great and last for a long time. Once the patching compound has had a chance to cure correctly, rinse it thoroughly with water.
Use a wire brush to remove any loose residue or bits of Cure & Seal that may have been dislodged during the curing period. This will make it easier to produce a smooth, level surface. You’re now ready to enjoy your newly repaired concrete steps and brick wall.
How do you fill vertical gaps on the sides of concrete steps and brick walls?
There are a few ways to fill vertical gaps in concrete steps and brick walls.
Use caulk
Caulk is a flexible sealant in various colors to match your concrete or brick. Simply apply the caulk to the gap using a caulking gun, and smooth it out with your finger.
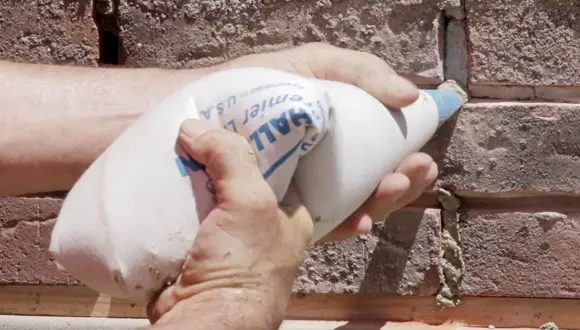
Use pourable grout:
Grout combines cement, sand, and water to fill joints between tiles. To use it, simply mix the grout according to the instructions on the package and then pour it into the gap. Use a putty knife to smooth it out, then allow it to dry.
Use epoxy
Epoxy is a durable resin used in various applications, including filling gaps in brick walls and concrete steps. Simply mix the epoxy as directed on the package and apply it to the gap using a putty knife. Allow it to dry for the recommended time before using the steps or wall.
How do you fill large gaps in concrete steps and brick walls?
You may try backer rods if you are worried about filling significant gaps. These flexible foam cylinders are inserted into cracks before the sealant is applied. They come in a variety of sizes to fit different widths of cracks. Once in place, the rod helps to support the sealant and prevent it from sagging or flowing into the crack. As a result, the repair will be stronger and last longer.
Using a backer rod also helps to ensure that the sealant is applied evenly, creating a neater repair. First, clean out any loose debris from the crack to fill a crack using a backer rod. Then, insert the rod into the crack, ensuring it is positioned evenly. Once in place, apply a sealant over the top of the rod. Allow the sealant to cure as directed by the manufacturer’s instructions before removing the rod. Your concrete steps or wall will be repaired and look good as new.
Make Sure It’s Done The Right Way
Sealing the spaces between the edges of concrete steps and brick walls isn’t always fun, but it’s necessary. Using caulk, mortar mix, or concrete patching compound, you can quickly and easily fill in these concrete cracks and gaps, preventing moisture and bugs from entering your home.
Follow the steps described above carefully to ensure that your concrete steps and brick walls are properly sealed. You can avoid costly repairs down the road by taking the time to do it right. We hope this guide was helpful and that you now feel confident in your ability to seal gaps between the sides of concrete steps and brick walls. Thanks for reading.
Topics of Interest: