How do you feel when you can’t see or hear your baby? If you’re like most parents, the feeling is overwhelming. Thankfully, there is a way to ease your mind and keep tabs on your little one even when you’re not in the room. This is by installing a baby monitor.
Now you may ask how to mount a baby monitor? The good news is that it’s a relatively easy process, and there are a number of ways to do it. In this article, we’ll take a look at some of the most popular methods for mounting a baby monitor.
How to Mount a Baby Monitor in Your Home?
There are several ways to mount baby monitor. You must consider where you plan to place it. Most baby monitors include an instruction sheet showing how to drill the holes.
If you want to place the device in a baby’s room, you can use a baby monitor wall mount, ceiling mount, crib mount, electricity plug mount, window mount, shelf mount, or corner mount.
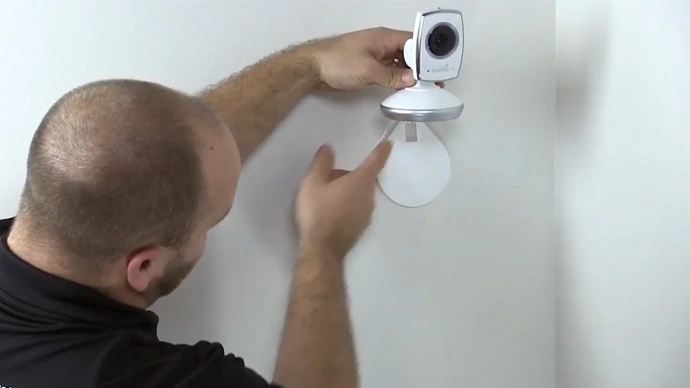
Wall Mount:
A baby monitor wall mount is an excellent option if you want to keep it within reach. You can either attach it to the wall or use a stand. Here are a few steps to follow:
Step 01. Choose the Location:
Choose an area on the wall where you would like to mount the infant optics baby monitor. Ensure it is near an outlet and away from the entire crib or bed.
Step 02. Mark the Location:
Using a level, mark the location where you will be attaching the mount. You can use a pencil or a marker.
Step 03. Drill the Holes:
Using a drill machine, drill a hole in the wall that is the same size as the wall mounting bracket on the back of the baby camera.
Step 04. Insert the Scrws:
Screw the wall mounting bracket into the hole. Use a screwdriver to tighten the screws.
Step 05. Attach the Video Baby Monitor:
Once the screws are in place, you can attach the video display to the mount. It is recommended to follow the manufacturer’s installation instructions if it comes with the wall mounting kit.
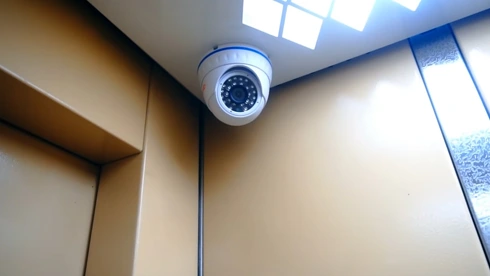
Ceiling Mount:
A ceiling mount is a good choice if you want to place only one monitor in a central location in your home. It can also be helpful if you have a large home and want to keep an eye on your baby from multiple locations. It can also give you a wider view of the room. Here are a few steps to follow:
Step 01. Locate the Joists in the Ceiling:
The first step is to locate the joists in the ceiling. You can either look up with a flashlight or use a stud finder.
Step 02. Drill the Holes:
Drill the holes in the ceiling where you located the joists. The holes should be big enough for the screws or anchors to fit through.
Step 03. Insert the Screws or Anchors:
Insert the screws or anchors into the holes. Use a screwdriver to tighten them in place.
Step 04. Hang the Video Monitor:
Once the screws or anchors are in place, you can hang the baby monitor to the joist. Make sure the video monitor is secure before leaving your child unattended.
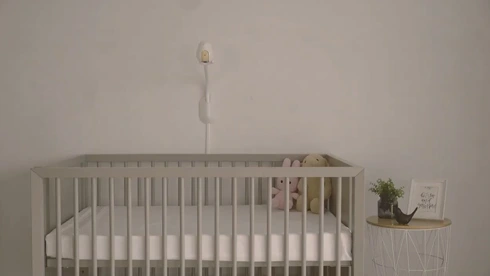
Crib Mount:
A crib mount is a great option if you want to keep the video monitor within reach of your baby. It attaches to the side of the baby crib and is adjustable so that it can be used with different-sized cribs. This mounting method can also be helpful if you want to use the device as a night light. Here are the steps to follow:
Step 01. Remove the battery cover and insert the batteries (if a model requires them).
Step 02. Find the mounting screws on the back of the monitor and remove them.
Step 03. Position the monitor where you want it to be on the baby’s crib and mark the spots for the screws with a pencil.
Step 04. Drill pilot holes into the crib safely at the markings you made.
Step 05. Insert the screws and tighten them up.
Step 06. Replace the battery cover. Optionally, you can also plug in the power cord at this time.
Electricity Plug Mount:
An electricity plug mount is a good option if you want to keep the video display close to your baby and not use any cords. It plugs into an outlet and has a built-in cord wrap for easy storage. Follow the steps below to install an electricity plug mount:
Step 01. Plug the monitor into the mount and plug the mount into an outlet.
Step 02. Turn on the monitor.
Step 03. Position the mount where you want it and use the attached adhesive strips to attach it to a wall or other flat surface.
Step 04. Carefully adjust the baby camera angle of the video display until you’re happy with the view.
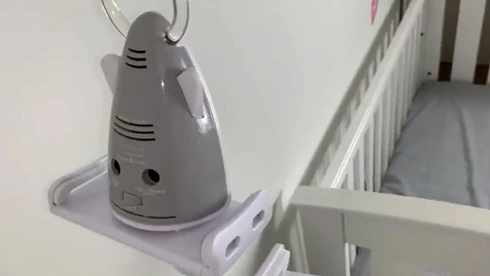
Shelf Mount:
A baby monitor shelf mount is a great option if you want to keep the device within view but out of your baby’s reach. This type of mount attaches to a shelf or other flat surface and can be rotated to different angles. Follow the steps below to install a shelf mount:
Step 01. Locate a sturdy shelf or other flat surfaces that can support the monitor’s weight and attach the mount using the included screws.
Step 02. Carefully lift the monitor and attach it to the mount.
Step 03. Rotate the monitor to the desired viewing angle and tighten the screws.
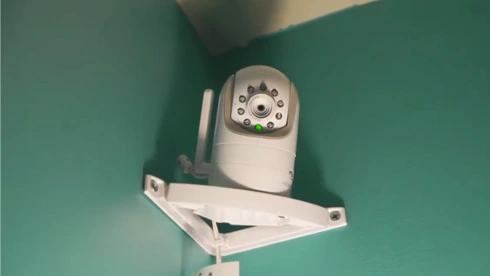
Corner Mount:
A corner mount is a great option if you want to place the video display in a specific location in your home. You can use a corner sheld to attach it with a 3M Command strip to the corner of a room. With AC Adapters, don’t use extension cords. Follow these steps to install a corner mount:
Step 01. Clean the surface where the 3M Command Strip will be attached.
Step 02. Remove the adhesive liner from the strip.
Step 03. Place the strip against the corner of the room and firmly press down for around 30 seconds.
Step 04. Wait one hour for the adhesive to set before using the monitor.
Window Mount:
A window mount is another option if you want to keep an eye on your baby while the infant is sleeping. The video display will be visible from outside the room, so you can keep an eye on your little one without having to enter the room. Here are the steps to mount a video baby monitor on the window:
Step 01. Check the specifications of your monitor to make sure it is compatible with a window mount.
Step 02. Find a window that is large enough to accommodate the monitor.
Step 03. Clean the window and dry it completely before mounting baby monitor.
Step 04. Peel the double face tape backing from the mount and attach it to the window.
Step 05. Align the baby monitor camera with the mount and press it against the adhesive until it is secure.
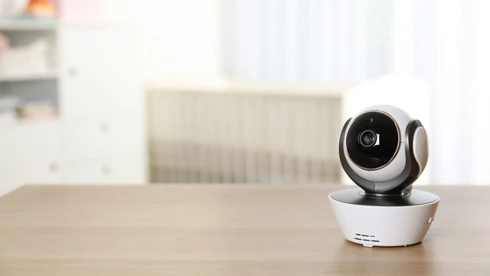
Table Mount:
If you want to use the first baby monitor while cooking or doing other activities in another room, a table mount is a good option. This type of mount attaches to the edge of a table or countertop and can be rotated to different viewing angles.
When you place it next to your baby’s changing pad, ensure that your baby cannot kick it off the dresser or begin to play with it. Here are the steps to install a table mount:
Step 01: Find a table or countertop that is as wide as the monitor.
Step 02: Drill a hole in the tabletop that is the same size as the mounting bracket on the back of the monitor.
Step 03: Screw the mounting bracket into the hole.
Step 04: Hang the monitor on the bracket.
How to Install a Baby Monitor Outside of Your Home?
If you are leaving your baby with a babysitter outdoor, like a yard or garden, you may want to consider using a portable baby monitor. These work just like regular baby monitors but include a battery pack so you can take them with you.
When choosing a portable monitor, be sure to check the battery life and the range. The battery life should be long enough to last an entire day, and the range should be high enough to cover your entire property.
You will need to make sure that the baby monitor is waterproof and weatherproof for outdoor installation. It is better to use a wall mounting system or window mounts for outdoor installation to avoid accidents.
Once you have chosen a portable monitor, follow the steps below to install it:
Step 01. Charge the battery pack according to the instructions.
Step 02. Turn on the monitor and ensure that it is in the correct mode for outdoor installation.
Step 03. Locate a flat surface to place the monitor.
Step 04. Drill a hole in the surface and feed the power cord through.
Step 05. Plug in the power cord and cover the hole with a plug to keep out moisture. Using a baby monitor cord cover will help you secure the wire. The wire is run through a hard plastic tube you attach to the wall.
Step 06. Place the monitor in the desired location and press it against the adhesive until it is secure.
Tips for Using a Baby Monitor Safely
There are some kid safety precautions to be aware of when using a baby monitor. Here are a few tips to keep in mind:
- Place the monitor in a central location in your home, such as the living room, so you can keep an eye on your baby at all times.
- Avoid using the monitor in areas with another electronic device, such as near microwaves or cordless phones.
- If you are using a portable monitor, always test the range before leaving your home.
- Do not place the monitor near water or in direct sunlight.
- Never place the monitor near the baby since baby monitors emit signals that can harm the baby’s health.
- If you are using a digital monitor, keep the screen brightness low to avoid straining your eyes.
- Keep the baby monitor cords out of reach of your baby. A loose wire can be a choking hazard.
- You shouldn’t use an extension cord.
- If you have multiple children, be sure to label each monitor with the child’s name to avoid confusion.
- Replace the batteries in your monitor regularly.
Common Problems with Baby Monitors and How to Solve Them
A few common problems can occur with baby monitors, and the solutions are usually easy to fix. Here are a few of the most common problems and their solutions:
1. The monitor is not receiving a signal from the baby unit: This could be due to a weak or interrupted signal. Try moving both units closer to each other or to a window.
2. The sound is too loud or too soft: Try adjusting the volume on the baby unit or the monitor.
3. The picture is fuzzy: This could be due to a weak signal. Try moving both units closer to each other or to a window.
4. There is no picture or sound: Check that both units are turned on and that the baby monitor cords are plugged in securely. If there is still no picture or sound, try resetting the units.
5. The monitor is beeping: There could be a number of reasons for this, such as low battery power or a lost signal. Try resetting the monitor to see if that solves the problem.
If you are experiencing any other problems with your monitor, look up the manufacturer’s instructions or contact customer service.
Types of Baby Monitor Holder
When choosing a baby camera holder, you should consider a few things. The most important factor is the type of mount the holder uses. There are four types of baby monitor holders: a camera stand, flexible tripod, universal child monitor mount kit, and adhesive strip.
Camera Stand:
A camera stand is a good option to keep the monitor stationary. It typically has a weighted base to prevent tipping over and a clamp to attach to a tabletop or other surface.
Flexible Tripod:
A flexible tripod is a good option if you want the monitor to be portable. It has three legs that can be bent and twisted into any position, making it easy to attach to nearly any surface. You can change a viewing angle quickly and easily.
Universal Baby Monitor Mount Kit:
This universal fit baby monitor clip is a good option if you want to attach the monitor to multiple surfaces. You need to use screws to attach it to a surface.
Adhesive Strip:
An adhesive strip is a good option to attach the monitor to a flat surface such as a wall or window. The strip has a strong adhesive that will keep the monitor in place.
FAQs:
There are a few common questions that many parents have about baby monitors. Here are the answers to some of the most Frequently Asked Questions:
01. How to Hide Baby Monitor Cord?
There are many ways to put the cord in a baby monitor. One way is to use a cord cover which can be found at most baby stores. You can also use a cord wrap, which is a small device that wraps the cord around itself to keep it from being a tripping hazard.
02. Is Wi-Fi Baby Monitor Safe from Hacking?
Some parents feel that Wi-Fi baby monitors are not as safe as traditional analog monitors because they broadcast a signal that can be hacked. Others feel that the risk of hacking is low and that the benefits of using a Wi-Fi monitor outweigh the risks. If you use a high-tech baby monitor with a strong password, you can help to reduce the risk of hacking.
03. Should I Leave the Baby Monitor on All Night?
Some parents choose to turn off the baby monitor after putting their child to sleep. Ultimately, the decision is up to you. If your baby’s sleep habits are predictable, you may be comfortable turning the monitor off at night. You may want to leave the monitor on if your baby is a light sleeper.
04. At what Age should You Stop using a Baby Monitor?
You should stop using a baby monitor when your baby is 4. When your baby can climb out of his crib, you don’t need to worry about him climbing out of the bassinet or baby crib and going into another room. You should also stop using a baby monitor when your child starts sleeping through the night.
05. Can I Move Baby Camera Remotely?
Yes, many baby monitors allow you to pan and tilt the camera remotely. This allows you to get a better view of your child’s room from any angle. Some baby monitors also have a night vision feature that allows you to see your child in the dark.
Conclusion:
A baby monitor is an important tool for parents. It allows you to keep an eye on your child, regardless of where you are. Mounting a baby monitor safely keeps your baby risk-free from unseen and dangerous wiring.
Knowing how to mount a baby monitor correctly is the key to a long life with your monitor. And finally, knowing when to stop using the baby monitor is an important step in your child’s growth. Use the best baby monitor with the highest resolution because nothing can compare with your baby’s safety.
Thanks for reading! We hope this article helped teach you how to safely and securely mount your video baby monitor.